Getting Started with KinD: Creating a Multi-node Local Kubernetes Cluster
Nowadays, Kubernetes is the most popular orchestration tool. So, have you ever wanted to become acquainted with its components, commands, or other related…
Nowadays, Kubernetes is the most popular orchestration tool. So, have you ever wanted to become acquainted with its components, commands, or other related information?
Simply you just need a platform to play around with Kubernetes.
There are numerous platforms for playing around with Kubernetes clusters. Kubeadm, Kops (Kubernetes Operations), Minikube, and Killercoda are a few examples. However, as far as I can tell, those options have limitations. These clusters/environments are either temporary (killercoda) or you can only create a single control-plane node with a single etcd database running on it (kubeadm) or you get only a single node cluster (minikube) or you must pay for what you consume.
What if we could create a highly available k8s cluster locally for development and testing? Which is permanent and does not require payment. That's fantastic, isn't it? Furthermore, if the cluster configuration procedure is simple?
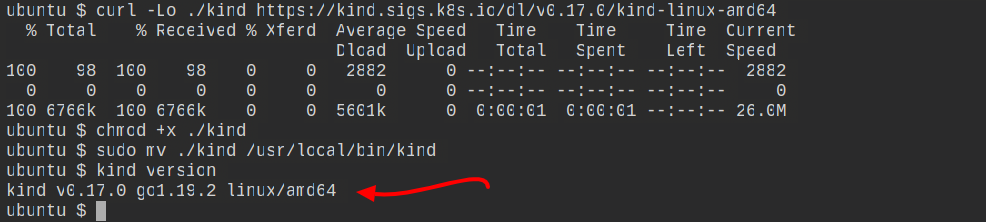
Yes, we are talking about KinD(Kubernetes in Docker). It is a tool for running local Kubernetes clusters using Docker container “nodes”. Kind was primarily designed for testing Kubernetes itself but may be used for local development or CI.
We discuss more about KinD in detail in this article, including how to use it to create single-node, multi-node, and multiple nodes clusters, as well as how to deploy an application to your kind cluster.
KinD (Kubernetes in Docker) is a simple tool with several powerful and unique features that make it easier to run local Kubernetes clusters. Kind is a Kubernetes SIGs project that is quite distinct from minikube. It encapsulates the cluster in Docker containers. This results in a substantially faster starting time as compared to running a VM.
With Kind, it is easy to spin up a local Kubernetes cluster within Docker Desktop. The Kind runs as a container by itself.
Kind documentation is easy and straightforward to understand, for more details and understanding refer this.
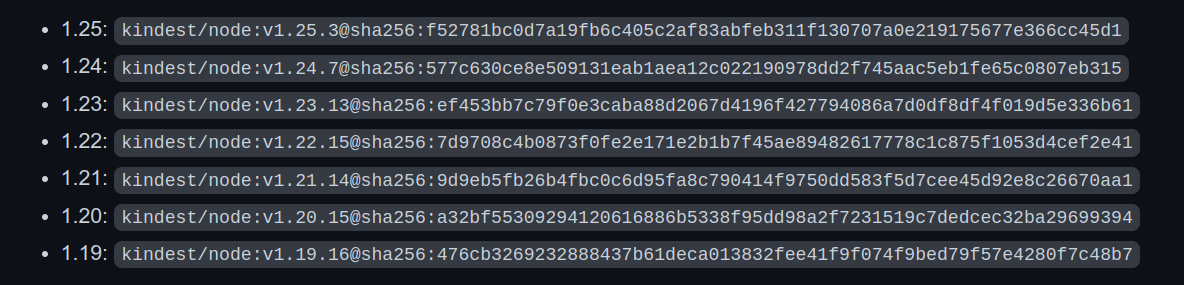
Using a different image allows you to change the Kubernetes version of the created cluster. Every version of kind supports the specific list of versions of Kubernetes, you can see the list of supported versions of Kubernetes from therelease page.
To create a multi-node kind-cluster environment use the config file given below.
# this config file contains all config fields with comments# NOTE: this is not a particularly useful config filekind: ClusterapiVersion: kind.x-k8s.io/v1alpha4# patch the generated kubeadm config with some extra settingskubeadmConfigPatches:- | apiVersion: kubelet.config.k8s.io/v1beta1 kind: KubeletConfiguration evictionHard: nodefs.available: "0%"# patch it further using a JSON 6902 patchkubeadmConfigPatchesJSON6902:- group: kubeadm.k8s.io version: v1beta3 kind: ClusterConfiguration patch: | - op: add path: /apiServer/certSANs/- value: my-hostname# 2 control plane node and 2 workersnodes:# the control plane node config- role: control-plane- role: control-plane# the two workers- role: worker- role: worker
In this config file, we are creating a multi-node cluster with two control planes and 2 worker nodes, you can create more according to your requirements.
Save the above config file as example-config.yaml .
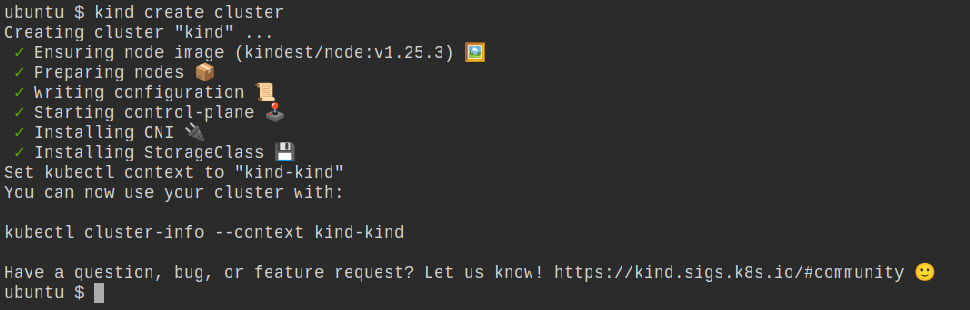
You can create a cluster using a pre-defined config file by using the command kind create cluster --config <file name> .
kind create cluster --config example-config.yaml
You can validate the multi-node clusters created by running the command kubectl get nodes to ensure that all nodes are running correctly.
To list all the running containers you can run docker ps .
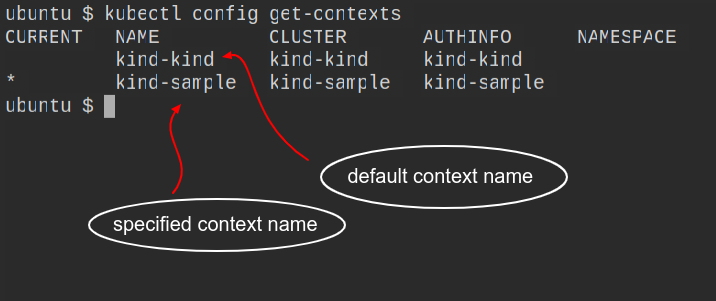
By running the command grep server ~/.kube/config, we can see that this server is the same as kind-external-load-balancer i.e. we are connecting with kind-external-load-balancer, which will directly communicate with other master nodes.
Dynamic Volume Provisioning in Kubernetes is a mechanism that allows storage volumes to be created on demand. To accomplish this, Kubernetes Cluster employs the Storage class concept, which abstracts the details of the underlying storage. Cluster administrators must manually call their cloud or storage provider and then create Persistent Volume objects in Kubernetes without dynamic provisioning.
Kind comes with a pre-configured default Storage Class when you create the kind cluster. To see the list of available storage classes, use the command kubectl get sc .
WaitforFirstConsumer indicates that pvc(persistent volume claim) will not be bound until it is attached to a pod.
Now, create a PVC file by using the given below code.
# local path provisioner only supports readwriteonceapiVersion: v1kind: PersistentVolumeClaimmetadata: name: pvc-testspec: storageClassName: standard accessModes: - ReadWriteOnce resources: requests: storage: 500Mi
Save this file as pvc.yaml and run the following command to create a persistent volume claim from this pvc. yaml file:
kubectl create -f pvc.yaml
Create another yaml file for the busybox pod by using the given below code and save it as busybox.yaml.
Run the following commands to validate the persistent volume or persistent volume claim created, and to check whether the pod is running or not:
kubectl get pv,pvckubectl get pods
Now we've actually built a multi-node pvc-backed cluster and mounted it on busybox.
You must expose your service after it has been deployed to Kubernetes so that your users can access it. The cluster can be accessed from outside in three ways: ingress, load balancer, and node port.
kind has the ability to export all kind related logs for you to explore.
#To export all logs from the default cluster (context name kind):kind export logs#Like all other commands, if you want to perform the action on a cluster with a different context name use the --name flag.kind export logs --name <context-name>
As you can see, kind put all of the cluster logs in a temporary directory. If you want to specify a location, simply follow the command with the path to the directory:
The structure of the logs will look more or less like this:
You can use the kubectl command-line tool to deploy an application to your KinD cluster. Create a deployment definition file that contains the specifics of your application. An example deployment definition file for a simple Nginx web server is provided below:
Save this file as nginx-deployment.yaml and then run the following command to create the deployment:
kubectl apply -f nginx-deployment.yaml
This command will create a deployment with three Nginx web server replicas.
To connect to the web server, you must first create a service that exposes the deployment. The following service definition file can be used to create a service:
Save this file as nginx-service.yaml and then run the following command to create the service:
kubectl apply -f nginx-service.yaml
This command will create a ClusterIP service, which will expose the Nginx web server deployment.
To obtain the IP address of the service, use the kubectl get services command. You can access the Nginx web server once you have the IP address by opening a web browser and navigating to http://<service-ip>:80.
There we are at the end, this blog covered how to set up a multi-node KinD cluster, including how to install KinD, configure the cluster, and deploy an application to the cluster. KinD is a useful tool for testing and development because it allows you to set up and manage a local Kubernetes cluster. KinD allows you to experiment with various configurations and deploy a wide range of applications, making it a valuable tool for any Kubernetes developer.
Don't forget to like and share this blog if you liked it. Connect with me on Twitter for getting updates on more such blogs.
I'm Chirag, a student at ABESIT in Ghaziabad. I am a Web Developer, DevOps Fan, and Open Source Contributor. I enjoy assisting and guiding others, participating in local and global communities, and making new connections.
I'm a member of a few communities from which I've learned a lot, and I'm doing everything I can to give back to those communities so that the members of those communities can benefit from my experience and learnings.