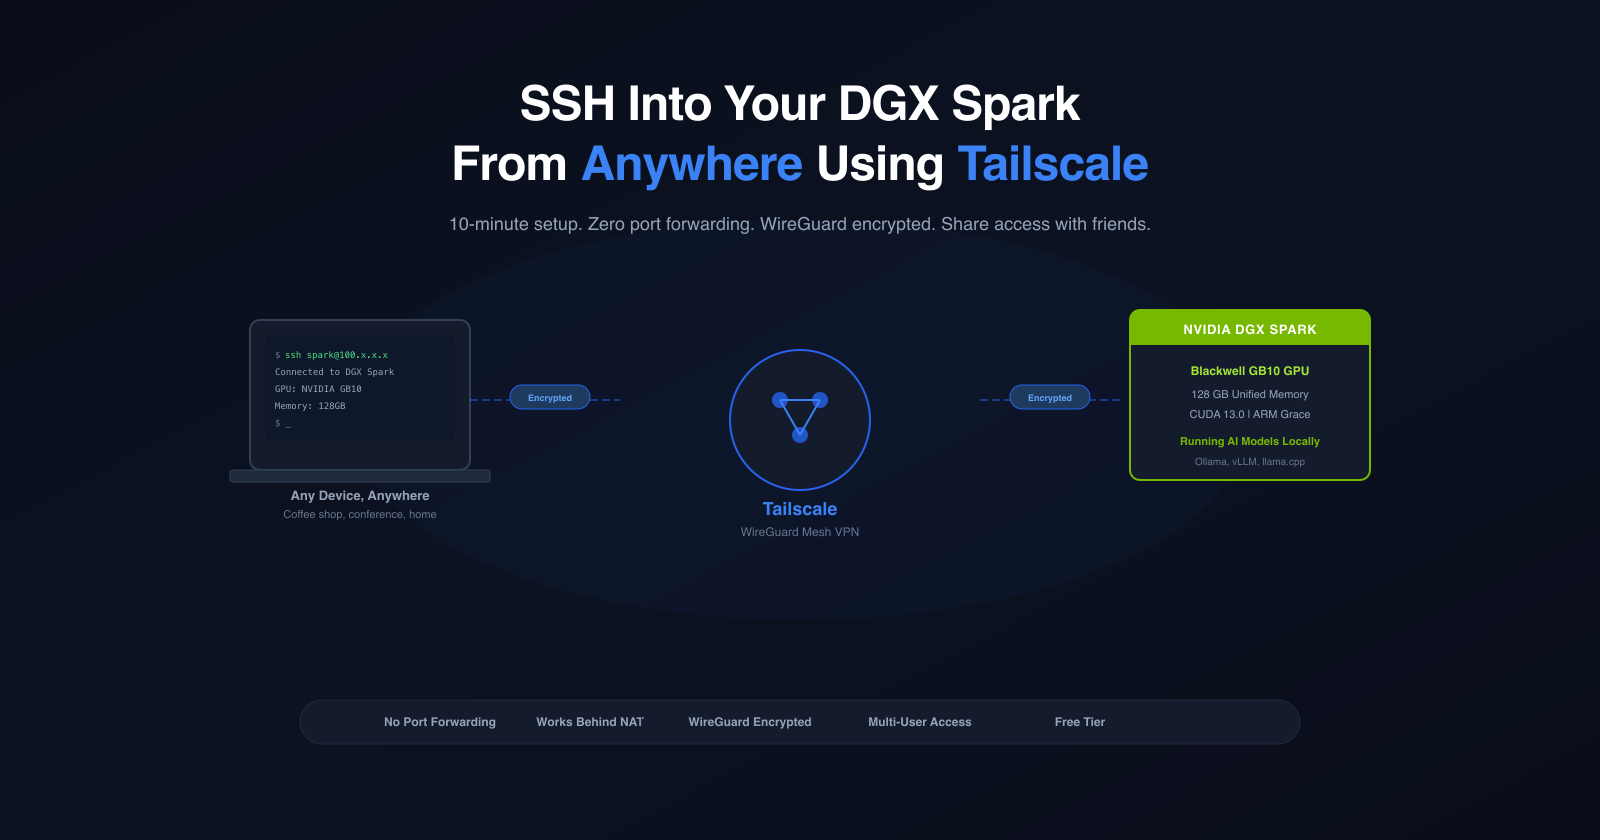
"SSH Into Your DGX Spark From Anywhere in the World Using Tailscale
Learn how to set up Tailscale on your NVIDIA DGX Spark for secure SSH access from anywhere in the world.

On this page (23)
- Why Tailscale?
- Prerequisites
- Step 1: Install Tailscale on the DGX Spark
- Step 2: Connect the Spark to Your Tailnet
- Step 3: Install Tailscale on Your Laptop
- macOS
- Windows
- Linux
- Step 4: SSH Into Your Spark From Anywhere
- Setting Up SSH Key Authentication
- What About My Second Laptop?
- Sharing Your Spark With a Friend
- Generate a Pre-Auth Key
- Your Friend's Setup (macOS)
- Add Their SSH Key to the Spark
- Troubleshooting
- "No Matching Peer" Error
- SSH Connection Timeout
- Permission Denied (publickey, password)
- Useful Commands Cheat Sheet
- Pro Tips
- Cleanup (If Needed)
- Wrapping Up
I recently got my hands on an NVIDIA DGX Spark, and the first thing I wanted to figure out was: how do I access this thing from anywhere? Whether I'm at a coffee shop, at a conference, or on a different network entirely — I want to just ssh in and get to work.
The answer? Tailscale. It took me about 10 minutes to set up, and now I can SSH into my Spark from any device, on any network, anywhere in the world. I even set up a friend with access — simultaneously — without giving them my credentials. Here's exactly how I did it.
Why Tailscale? #
Tailscale creates a private mesh network (called a "tailnet") between your devices. No port forwarding, no static IPs, no VPN server to maintain. You install it on your devices, log in with the same account, and they can talk to each other. It's built on WireGuard, so it's fast and encrypted.
For the DGX Spark, this means:
-
No need to be on the same WiFi network
-
No need to mess with your router settings
-
Works behind NATs and firewalls
-
Encrypted end-to-end
Prerequisites #
Before starting, make sure your DGX Spark:
-
Is running Ubuntu 24.04 or newer
-
Has internet connectivity
-
You have sudo access
Here's what my system looked like:
$ lsb_release -a
No LSB modules are available.
Distributor ID:    Ubuntu
Description:    Ubuntu 24.04.3 LTS
Release:    24.04
Codename:    noble
A quick ping to confirm internet:
$ ping -c 3 google.com
64 bytes from tzdela-ba-in-x0e.1e100.net: icmp_seq=1 ttl=118 time=15.3 ms
64 bytes from tzdela-ba-in-x0e.1e100.net: icmp_seq=2 ttl=118 time=13.7 ms
64 bytes from tzdela-ba-in-x0e.1e100.net: icmp_seq=3 ttl=118 time=17.2 ms

--- google.com ping statistics ---
3 packets transmitted, 3 received, 0% packet loss
And verify sudo access:
$ sudo whoami
root
Good to go.
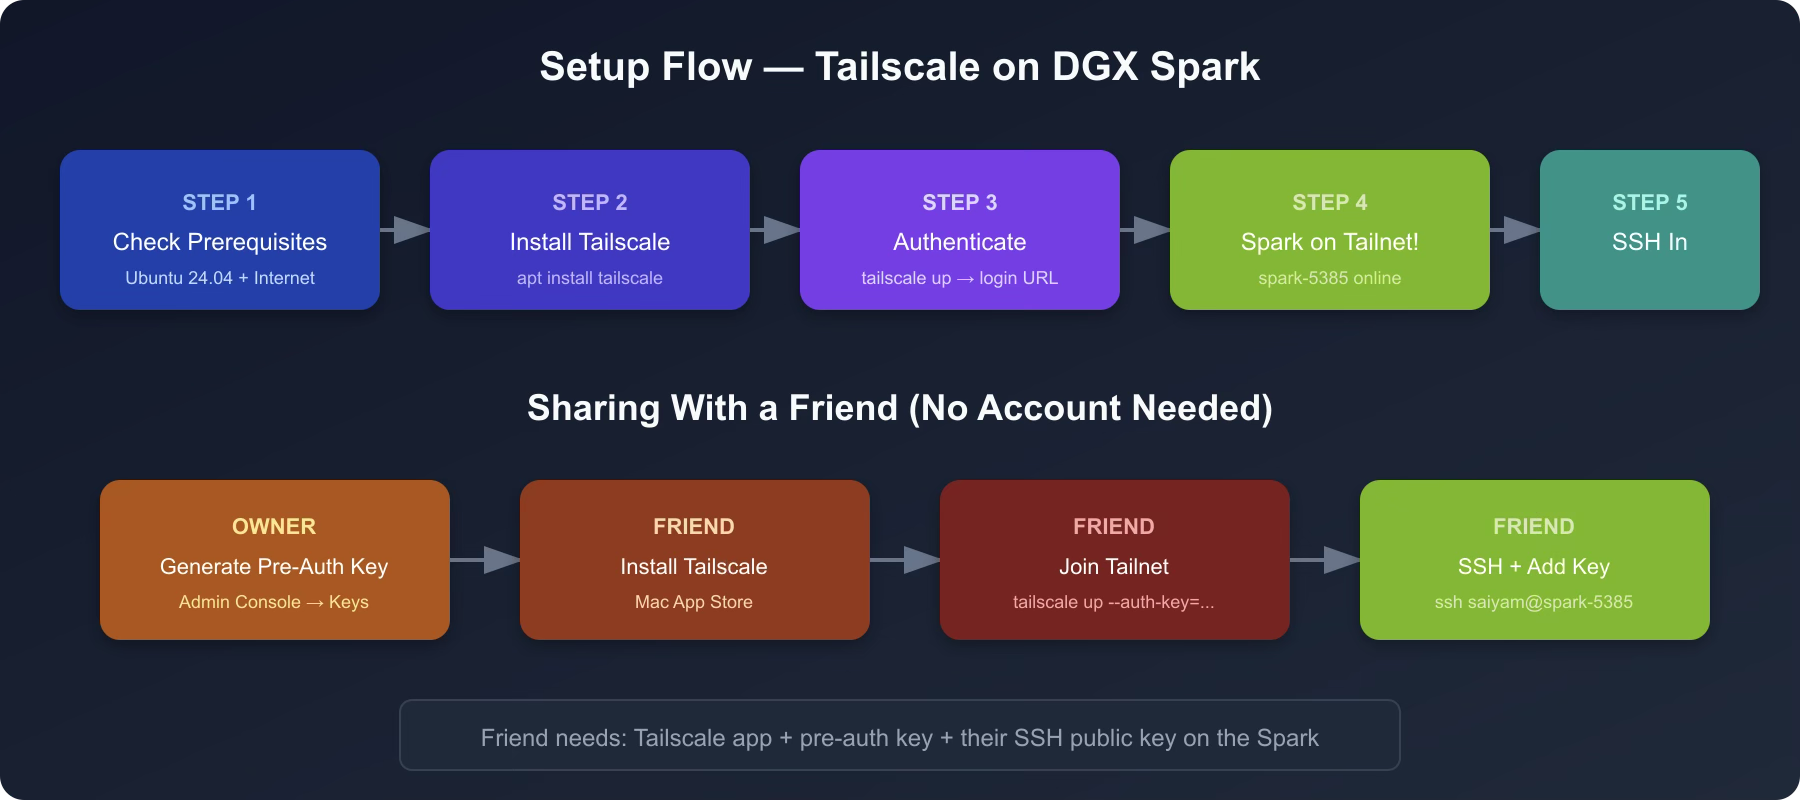
Step 1: Install Tailscale on the DGX Spark #
SSH into your Spark (or use a directly connected keyboard/monitor) and run:
# Update package list and install prerequisites
sudo apt update
sudo apt install -y curl gnupg

# Add Tailscale signing key
curl -fsSL https://pkgs.tailscale.com/stable/ubuntu/noble.noarmor.gpg | \
  sudo tee /usr/share/keyrings/tailscale-archive-keyring.gpg > /dev/null

# Add Tailscale repository
curl -fsSL https://pkgs.tailscale.com/stable/ubuntu/noble.tailscale-keyring.list | \
  sudo tee /etc/apt/sources.list.d/tailscale.list

# Install Tailscale
sudo apt update
sudo apt install -y tailscale
You'll see the repository being added and the package installing:
# Tailscale packages for ubuntu noble
deb [signed-by=/usr/share/keyrings/tailscale-archive-keyring.gpg] https://pkgs.tailscale.com/stable/ubuntu noble main
...
Setting up tailscale (1.94.2) ...
Created symlink /etc/systemd/system/multi-user.target.wants/tailscaled.service → /usr/lib/systemd/system/tailscaled.service.
Verify the installation:
$ tailscale version
1.94.2
  tailscale commit: 0a29cf18b56e478b9cd33af07755fcae90d5171a
  long version: 1.94.2-t0a29cf18b-g3f044c9f6
  go version: go1.25.5
Check the service is running:
saiyam@spark-5223:~$ sudo systemctl status tailscaled --no-pager
[sudo] password for saiyam:
● tailscaled.service - Tailscale node agent
     Loaded: loaded (/usr/lib/systemd/system/tailscaled.service; enabled; preset: enabled)
     Active: active (running) since Tue 2026-04-07 11:13:14 UTC; 9min ago
       Docs: https://tailscale.com/docs/
   Main PID: 2410 (tailscaled)
     Status: "Connected; saiyam911@gmail.com; 100.120.233.78 fd7a:115c:a1e0::f83a:e94e"
      Tasks: 22 (limit: 153561)
     Memory: 45.4M (peak: 53.7M)
        CPU: 615ms
     CGroup: /system.slice/tailscaled.service
             └─2410 /usr/sbin/tailscaled --state=/var/lib/tailscale/tailscaled.…
The status says "Needs login" — that's expected. We'll authenticate next.
Step 2: Connect the Spark to Your Tailnet #
This is the magic step:
$ sudo tailscale up

To authenticate, visit:

    https://login.tailscale.com/a/1ff5e3e9017787
Open that URL in any browser, log in with your account (Google, GitHub, Microsoft — whatever your org uses), and you'll see:
Login successful. Your device spark-5223 is logged in
Back on the Spark terminal, you'll see:
Success.
Some peers are advertising routes but --accept-routes is false
That's it on the Spark side. Your DGX Spark is now part of your private Tailscale network with the hostname spark-5223.
Note: The
--accept-routesmessage is harmless for SSH access. You can ignore it. If you ever need subnet routing, runsudo tailscale up --accept-routes.
Step 3: Install Tailscale on Your Laptop #
macOS #
-
Option A: Download from the Mac App Store (search "Tailscale")
-
Option B: Download the
.pkgfrom tailscale.com/download
Open the app, click Log in, and sign in with the same account you used on the Spark.
Windows #
-
Download the installer from tailscale.com/download
-
Run the
.msifile -
Launch Tailscale from the system tray
-
Log in with the same account
Linux #
Same commands as the Spark:
sudo apt update
sudo apt install -y curl gnupg

curl -fsSL https://pkgs.tailscale.com/stable/ubuntu/noble.noarmor.gpg | \
  sudo tee /usr/share/keyrings/tailscale-archive-keyring.gpg > /dev/null

curl -fsSL https://pkgs.tailscale.com/stable/ubuntu/noble.tailscale-keyring.list | \
  sudo tee /etc/apt/sources.list.d/tailscale.list

sudo apt update
sudo apt install -y tailscale
sudo tailscale up
Step 4: SSH Into Your Spark From Anywhere #
First, confirm both devices see each other:
$ tailscale status
100.104.142.22  spark-5223           saiyamxxx@  linux  -
100.108.115.75  saiyams-macbook-pro  saiyam9xxx@  macOS  -
You should see your Spark listed. Now, simply:
ssh saiyam@spark-5223That's it. Tailscale's MagicDNS resolves spark-5223 to the right Tailscale IP automatically. No need to remember IP addresses.
If MagicDNS isn't working for some reason, use the Tailscale IP directly:
# Find the IP
tailscale status
# Look for spark-5223 and note the 100.x.x.x address

ssh saiyam@100.104.142.22
Setting Up SSH Key Authentication #
For passwordless SSH access, set up key-based authentication. If you already have an SSH key (check ~/.ssh/id_ed25519.pub or ~/.ssh/id_rsa.pub), add it to the Spark:
# Copy your public key to the Spark (will ask for password once)
ssh-copy-id saiyam@spark-5223
Or manually add it on the Spark:
# On the Spark — append the public key
echo "your-public-key-here" >> ~/.ssh/authorized_keys
chmod 600 ~/.ssh/authorized_keys
chmod 700 ~/.ssh
After that, SSH works without a password prompt.
Note: Password authentication still works alongside SSH keys. You don't have to choose one or the other.
What About My Second Laptop? #
This is the beauty of Tailscale — just install and log in:
-
Install Tailscale on the second laptop (using the steps above for your OS)
-
Log in with the same account
-
Run
ssh saiyam@spark-5223
No extra configuration on the Spark. Every device on your tailnet can reach every other device automatically.
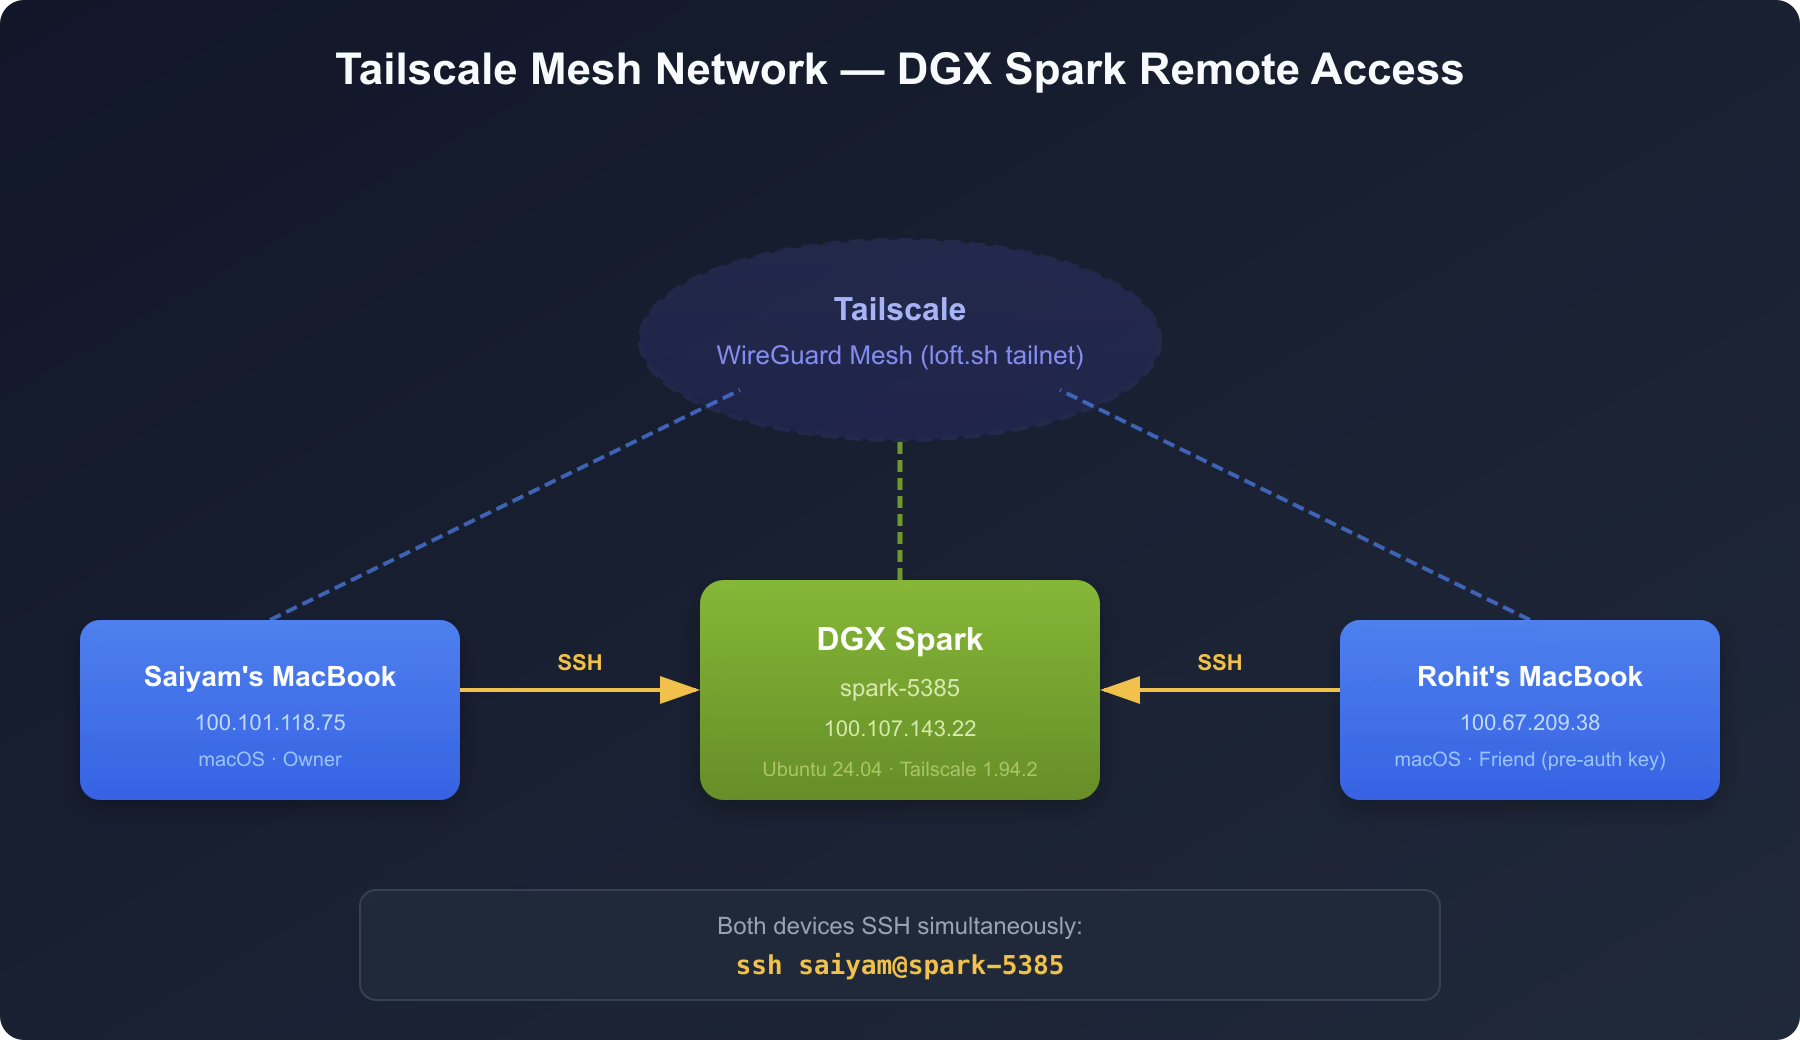
Sharing Your Spark With a Friend #
What if a friend also needs SSH access to your Spark — simultaneously, from their own laptop? You don't need to create a new Tailscale account for them. Use a pre-auth key to add their device to your tailnet.
Generate a Pre-Auth Key #
-
Go to the Tailscale Admin Console
-
Click "Generate auth key..."
-
Enable Reusable if you want it to work for multiple devices
-
Set an expiration as needed
-
Copy the key (starts with
tskey-auth-...)
Your Friend's Setup (macOS) #
-
Install Tailscale from the Mac App Store
-
Important: If they're already logged in to their own Tailscale account, they need to leave it first:
sudo tailscale logout -
Join your tailnet using the pre-auth key:
sudo tailscale up --auth-key=tskey-auth-xxxxxxxxxxxx -
That's it — their Mac is now on your tailnet. No login, no email needed.
Add Their SSH Key to the Spark #
Your friend should generate an SSH key on their Mac (if they don't have one):
ssh-keygen -t ed25519Then share their public key with you (the contents of ~/.ssh/id_ed25519.pub). On the Spark, add it:
echo "ssh-ed25519 AAAA...their-key-here... friend@hostname" >> ~/.ssh/authorized_keys
chmod 600 ~/.ssh/authorized_keys
Now your friend can SSH in directly:
ssh saiyam@spark-5223No password prompt — the key handles authentication automatically. SSH automatically tries keys from the default location (~/.ssh/id_ed25519), so your friend does not need to use ssh -i.
Verify it all works:
$ tailscale status
100.104.142.22  spark-5223           saiyamxxx@  linux  -
100.67.209.38   rohits-macbook-pro   saiyamxxx@  macOS  -
100.108.115.75   saiyams-macbook-pro  saiyamxxx@  macOS  -
Three devices, one tailnet, simultaneous SSH access.
Tip: You can manage access from the Tailscale Admin Console. To revoke someone's access, remove their device from the console and delete their key from
~/.ssh/authorized_keyson the Spark.
Troubleshooting #
"No Matching Peer" Error #
If your friend gets a "no matching peer" error when trying to SSH, it means they're on a different tailnet — not yours.
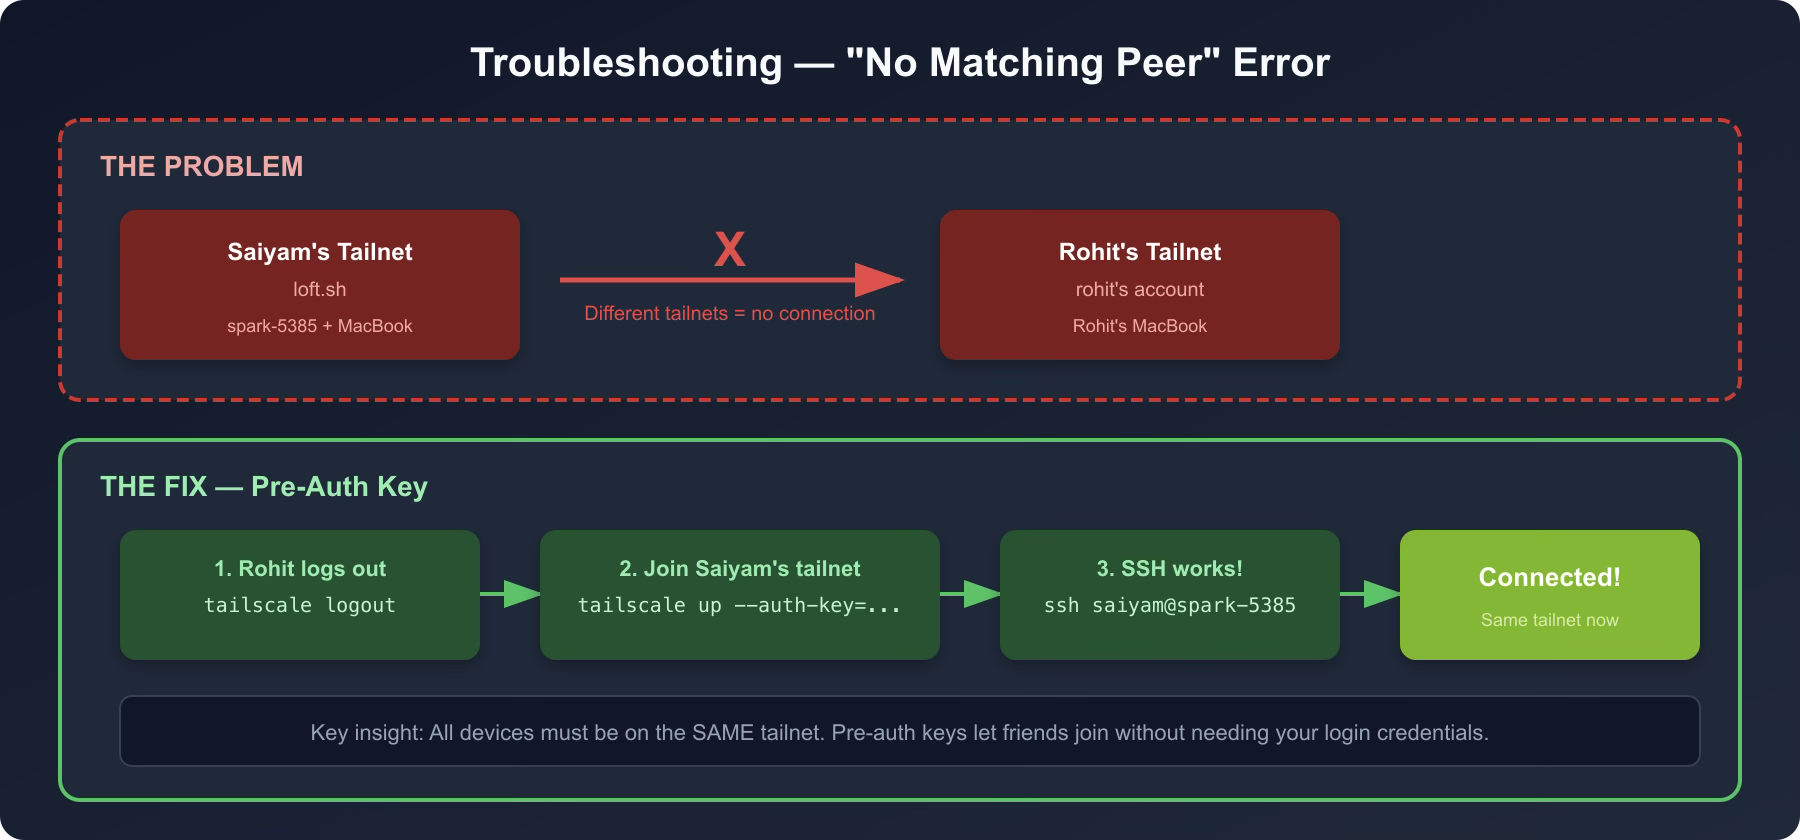
The 100.x.x.x Tailscale IPs are only reachable between devices on the same tailnet. The fix:
# Friend logs out of their own tailnet
sudo tailscale logout

# Friend joins YOUR tailnet with your pre-auth key
sudo tailscale up --auth-key=tskey-auth-xxxxxxxxxxxx
SSH Connection Timeout #
If tailscale ping works but SSH times out:
# On the Spark — check SSH is running
sudo systemctl status ssh

# Check firewall isn't blocking
sudo ufw status

# If SSH isn't running
sudo systemctl start ssh

# If firewall is active and blocking
sudo ufw allow 22/tcp
Also check SSH is listening on all interfaces:
$ ss -tlnp | grep 22
LISTEN  0  4096  0.0.0.0:22  0.0.0.0:*  users:(("sshd",...))
LISTEN  0  4096     [::]:22     [::]:*  users:(("sshd",...))
If SSH is only listening on a specific IP, edit /etc/ssh/sshd_config to ensure ListenAddress is not restricted, then sudo systemctl restart ssh.
Permission Denied (publickey, password) #
This means SSH connected but authentication failed. Either:
-
Your SSH key isn't in
~/.ssh/authorized_keyson the Spark -
You're using a non-default key path (use
ssh -i /path/to/key) -
Password authentication is disabled in sshd_config
Check the authorized keys on the Spark:
cat ~/.ssh/authorized_keysMake sure your public key is listed there.
Useful Commands Cheat Sheet #
| Command | What it does |
|---|---|
tailscale status | List all devices on your tailnet |
tailscale ping spark-5223 | Test connectivity to a device |
tailscale ip | Show your device's Tailscale IP |
ssh saiyam@spark-5223 | SSH using MagicDNS hostname |
sudo tailscale up | Connect to tailnet |
sudo tailscale down | Disconnect from tailnet |
sudo tailscale logout | Leave the current tailnet entirely |
ssh-copy-id saiyam@spark-5223 | Copy your SSH key to the Spark |
Pro Tips #
-
Tailscale starts on boot — the
tailscaledservice is enabled by default, so your Spark will rejoin the tailnet automatically after a reboot. -
Forward ports for Jupyter — if you run JupyterLab on your Spark:
ssh -L 8888:localhost:8888 saiyam@spark-5223Then open
http://localhost:8888in your browser. -
File transfers work too:
scp model.bin saiyam@spark-5223:~/models/ -
Check who's connected — on the Spark, see active SSH sessions:
who -
Tailscale admin console — monitor all devices, manage keys, and remove devices at login.tailscale.com/admin.
Cleanup (If Needed) #
If you ever want to remove Tailscale from your Spark:
sudo tailscale down
sudo apt remove --purge tailscale
sudo rm /etc/apt/sources.list.d/tailscale.list
sudo rm /usr/share/keyrings/tailscale-archive-keyring.gpg
sudo apt update
To restore: re-run installation steps 1-2.
Wrapping Up #
The whole setup took me about 10 minutes. Now I can SSH into my DGX Spark from my MacBook at home, my second laptop on the go, and even my friend can access it simultaneously from his MacBook — all without any port forwarding, static IPs, or VPN servers.
The key takeaways:
-
For yourself: Install Tailscale on both devices, log in with the same account,
sshin -
For friends: Generate a pre-auth key, have them join your tailnet, add their SSH public key to the Spark
-
Troubleshooting: Make sure all devices are on the same tailnet, SSH is running, and keys are in
authorized_keys
Just ssh saiyam@spark-5223 — from anywhere in the world.
I also used this at 30000 feet in the air!
Saiyam is working as Head of DevRel at vCluster Labs. He is the founder of Kubesimplify, focusing on simplifying cloud-native & AI infrastructure. He is KubeCon Co-chair and has worked on many facets of Kubernetes, including machine learning platforms, scaling, multi-cloud, & managed Kubernetes services. When not coding, Saiyam contributes to the community by writing blogs and organizing local meetups for Kubernetes and CNCF. He is also a CNCF TAG OpsRes Chair & can be reached on Twitter @saiyampathak.
Get new posts in your inbox.
Spotted a typo or want to improve this post? Edit on GitHub →
Discussion
Related posts
nvidia
Day 5: Local LLM Inference Engines, Wrappers, and What to Pick
56 min read
nvidia
Day 4: Quantization Demystified. BF16, FP8, NVFP4, MXFP4, INT4, GGUF, and Why It All Matters
28 min read
nvidia
Day 3: The DGX Spark Unpacked. GB10, Unified Memory, sm_121, and the One Reason This Hardware Exists
19 min read